Tutorial Assignment:
Web Design with FrontPage
![]()
Introduction
FrontPage is a powerful tool used to design, create and publish web sites. You choose the type of web site you want, while FrontPage generates and organizes all the web site documents you need. Then you can fill your web site with the text, pictures, sounds and other features you want your visitors to experience.
In this tutorial you will learn how to create your own web page by means of Microsoft FrontPage.
Learning Objectives
This tutorial will help you to learn how to:
Navigate in FrontPage 2000
Create, save, and preview new web pages
Format text on your web page, and change backgrounds
Add and edit graphics, sound, and video; include text alternatives to images
Add borders and buffers
Add and edit hyperlinks and bookmarks
Use tables in web pages
Create forms, radio buttons, check boxes, drop-down menus, and on-line text boxes
Add a timestamp and hit counter to your web page.
Step-by-Step tasks
Individual pages can contain just about anything - and everything. For example, you can include photos of yourself, your dog, your brother, or your brother's dog. Perhaps you'd opt for a written story of your life with your favorite poem, or your favorite recipe. You can have links to your favorite web sites, a list of your favorite hockey players, an audio clip of you playing the kazoo, a video clip of you doing the Mexican Hat Dance, a photo of that giant pumpkin in your garden - whew! I'm losing my breath over here! Anyway, the point is, you can make an individual web page, and whatever you put on it is entirely up to you. Like each person in the world, each web page is unique.
Follow the steps below to create and enhance your own web page.
15. 1 Navigation
|
|
|
Buttons on the View toolbar give you the opportunity to look at your web site design in seven different ways - like looking at the same thing from seven different perspectives. |
Switching
views
When FrontPage finishes generating your web site, you will see a Navigation diagram in the top part of a split screen. This flow chart is an outline of your web site, and it shows how the individual web pages will connect to one another. In the lower screen, you will see a list of the files and folders that FrontPage has made for you.
|
The Views toolbar shows you seven different ways of looking at your web site. 1. Click on the first icon of the Views toolbar. Look at the view you are given.
2. Click on each of
the other Views icons. Look at each view one by one, just to check them
out. |
15.2 To create and save a new page:
|
|
15.3 Working on a web page
At the bottom of the screen are three tabs: Normal, HTML and Preview. Always select the Normal tab when working on your page.

To add text to your Web page:
1) If you are not in Page View, click the Page button on the Views bar.

2) Click the Normal tab at the bottom of the page.

3) Insert the cursor into the blank page.
4) Type your text.
|
|
15.4 Formatting
text
15.5 Changing backgrounds
|
1. Click Format on the menu bar and select Background. You will see the Page Properties dialog box.
2. Click the Background tab, then click the Background drop-down list. Choose a color from the list, then click OK on the Page Properties dialog box.
|
15.6 Previewing your page
When visitors visit your web site, they will look at it through an Internet browser like Internet Explorer or Netscape Navigator. When viewed through these browsers, your page will look somewhat different than it does in FrontPage. There are two ways to preview what your visitors will see:
Option 1. Click the Preview tab at the bottom of the screen. The broken lines dividing your web page will disappear. This view is similar - but not exactly the same - to what your web site visitors will see.

Option 2. Click the Preview button on the Standard toolbar. This action will open your Internet browser and display your web page in it. This option gives you the most accurate view of what your web site visitors will see.

15.7 Checking your spelling
FrontPage 2000 has a spell checker that can be used on all your web pages. To check your spelling:
1. Click the Check Spelling button on the Standard toolbar.

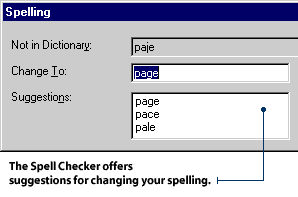
2. If the program finds a word that is not in its dictionary, a Spelling dialog box will appear showing you a list of similar words. Click on the word you want to use, then click the Change button in the Spelling dialog box.
15.8 Defining web graphics
All graphic images appearing in web sites must be saved in special image files that can be recognized by Internet browsers. These files come in two file formats: GIFs and JPEGs. FrontPage can convert many different types of graphic images into either of these file types. There are three main differences between GIFs and JPEGs:
1. A GIF file can interlace, which means when your web site visitors are waiting for the image to load into their computers, they will see a blurry image slowly fading into view. A JPEG does not interlace, which means visitors will see a blank page as the image slowly loads line-by-line from top to bottom.
2. With a GIF file, the background of an image can be made transparent so the image looks like it is floating on your web page. A JPEG file does not have this transparency option.
3. While a GIF can display up to 256 colors, a JPEG can display millions. Which one should you use? JPEGs are often used for photo images when you want to have a wide range of realistic-looking colors. However, the trade-off for this higher quality color is that it takes longer for your web site visitors to see the image. GIFs are used more commonly - but the choice is up to you.
To add a clip art image to your Web
site: 1) Place the cursor on the page.
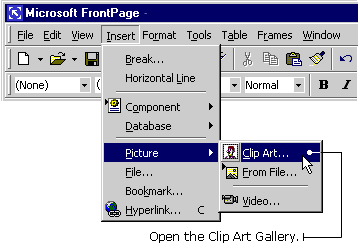
2) Click Insert on the Menu bar and select Picture, then Clip Art.
The Clip Art Gallery dialog box appears.
3) Click the Pictures tab. A group of picture categories appears.
4) Click the category of your choice. A group of pictures appears.
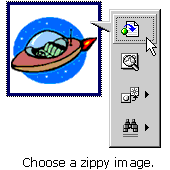
5) Click the picture you want to add. A drop-down list of buttons appears.
6) Click the Insert Clip button.
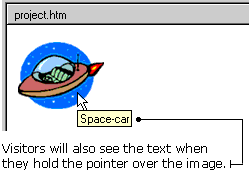
To add alternative text to an image:
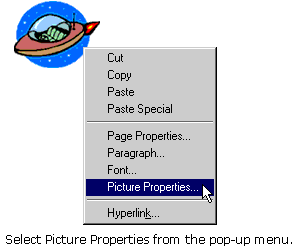
1) Place the pointer on the image and right-click your mouse button. A pop-up menu appears.
2) Click on Picture Properties. The Picture Properties dialog box appears.
3) Click the General tab.
4) Type the alternative text into the Alternative Representations text box.
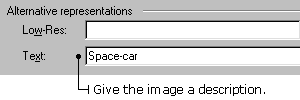
5) Click OK in the Picture Properties dialog box.
15.9 Adding a background graphic
Any graphic image can be used as a background pattern for your web page. You can use a single large image to fill in the entire background. You can also use a small image that will be "tiled" - which means it will be duplicated in a checkerboard pattern across the web page. To add a background graphic from the Clip Art Gallery:
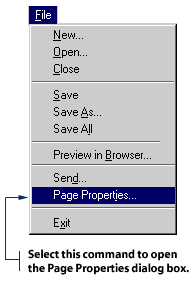
1. Click File on the Menu bar, then select Page Properties. The Page Properties dialog box will appear.
2. Click the Background tab.
3. Click the Background Image check box, then click the Browse button.
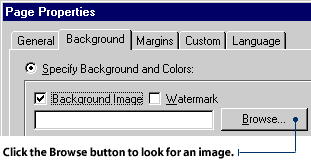
4. A Select Background Image dialog box will appear. Click the Clip Art button to open the Clip Art Gallery.
5. Click Web Backgrounds. Select a background pattern, then click the Insert button.
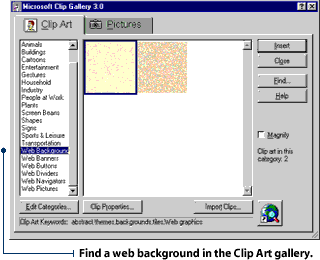
6. Click OK on the Page Properties dialog box.
15.10 Adding your own image
You can choose any digital graphic image you want for your web page. This includes images you have scanned or collected from the Internet and stored on your local drive. FrontPage 2000 will automatically convert your image into a GIF or JPEG after you insert it onto your web page. To add your own image to your web page:
1. Place the cursor on your web page. Position it where you would like the image to appear.
2. Click Insert on the Menu bar and select Image. The Image dialog box will appear.
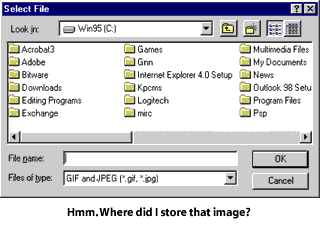
3. To select a file stored on your local drive, click on the "Select a file on your computer" button.

4. Choose an image file from your local drive, then click OK.
15.11 Saving an attached image
When you insert images into your web page, they aren't a permanent part of the site until each one is saved individually. When you save your images, FrontPage lets you rename the files, move them to different folders or choose not to save particular files with the rest of the web page you are saving. To save your web page and new image files:
1. Click the Save button on the Standard toolbar.
2. If you have not yet saved the newly inserted images to your web site, a Save Embedded Files dialog box will appear. The box will list the files you have inserted. You can preview each image by clicking it and viewing it in the Image Preview window.
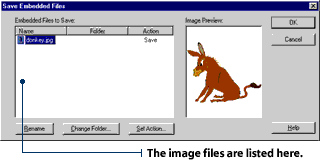
3. To keep things organized, it's a good idea to save all your images in one folder. By default, FrontPage will save images to the images folder in your web site.
![]()
4. If you want to save the images to another folder, click the Change Folder button and select another folder in your web site.
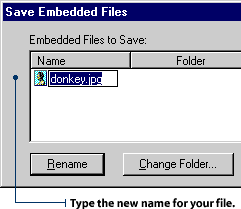
5. If you want to rename an image file, click the Rename button and type a new file name.
6. When you are done, click OK. The Save Embedded Files dialog box will close.
15.12 Making a transparent image
You can make a transparent GIF by removing the background
color that surrounds an object. This is a good option if you want the object to
float on your web page background. Or, if you want web graphics that have
outlines other than square or rectangular.

To make a transparent image:
1. Select the image by clicking on it.
2. Click the Make Transparent button on the Image Toolbar.

3. Move the cursor over the color you want to make transparent, then click once.
4. The color you selected will become transparent.
15.13 Making interlaced images
FrontPage lets us create interlaced images. This allows the
image to start appearing before it's fully loaded. That way, the viewer can
gauge if the image is going to be worth the wait.
You can interlace your GIF files to create a special visual effect for your
web site visitors. When a file is interlaced, your visitors will see a blurry
image that slowly fades into view while they wait for the complete image to load
into their computers. Otherwise, they would have to wait to see the image
filling in line-by-line from the top to the bottom of the screen. To interlace a
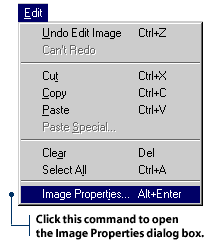
GIF file: 1. Select the image by clicking on it. 2. Click Edit on the Menu Bar and select Image Properties. 3. The Image Properties dialog box will appear. Select the General tab.
4. Select the Interlaced check box, then click OK.


15.14 Resizing an image
To resize an image:
1. Select the image by clicking on it.
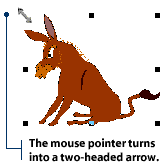
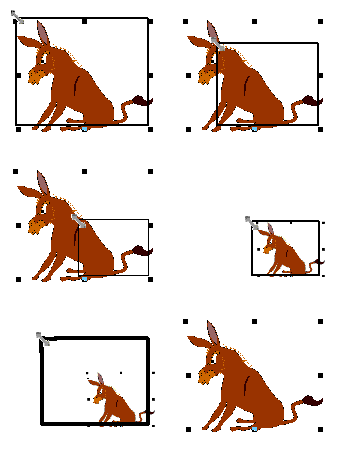
2. You will see eight sizing dots at the corners and sides of the image. Move your mouse pointer over one of these dots. The pointer will turn into a two-headed arrow.
3. Click and hold your mouse button, then drag your mouse to change the size of the image.
![]()
15.15 Cropping an image
To "crop" an image means to remove a portion of it. You may
only want to show part - but not all - of a particular image. For example, you
may want to crop an image in the following scenario: you have a close-up photo
of yourself with many other people in the background. You can draw visual
attention to yourself by cutting off the part of the photo that contains the
other people.
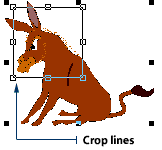
To crop an image: 1. Select the image by clicking on it. 2. Click the Crop button on the Image toolbar. 3. You will see eight small white dots at the corners and sides of the image.
Move your mouse over one of these dots and see it turn into a two-way arrow.
4. Hold down your mouse button and drag the arrow to outline the size you
want the image to be. Let go of your mouse button when the correct area is
outlined.
5. Press the Enter key.


15.16 Adding borders and buffers
There are two ways to offset an image from the rest of the web page. You can use an image border, which is a set of lines that surround an image. You can also use an image buffer, which is a blank space that surrounds an image.
To add a border:
1. Select the image by clicking on it.
2. Click Edit on the Menu bar and select Image Properties.
3. The Image Properties dialog box will appear. Select the Appearance tab.
4. To make a thicker border, click the up-arrow on the Border Thickness spin control boxes. To make a thinner border, click the down-arrow.
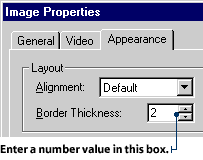
5. Click OK on the Image Properties dialog box.
To add a buffer:
1. Select the image by clicking on it.
2. Click Edit on the Menu Bar and select Image Properties.
3. The Image Properties dialog box will appear. Select the Appearance tab.
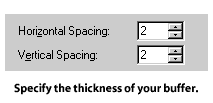
4. To make a thicker buffer, click the up-arrows on the Horizontal Spacing and Vertical Spacing spin control. To make a thinner buffer, click the down-arrows.
5. Click OK on the Image Properties dialog box.
15.17 Checking image size and speed
It's important to keep track of how long it will take for
your page to download onto your web site visitor's computer. The bigger the
image file, the longer it will take - and if your visitors have to wait too
long, they may get bored and leave. Some people are more patient than others,
but it's safe to assume that 20 seconds is an acceptable download time for your
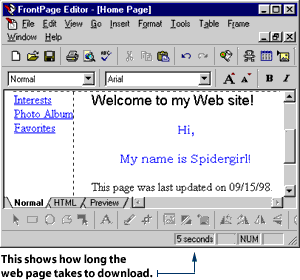
entire page. The time indicator at the bottom of the FrontPage screen shows you
an estimate of how many seconds it will take for your page to download on a 28.8
modem.
15.18 Including a text alternative
Some people shut off the image display on their Internet browsers because they don't want to wait for images to download. This means they see text only - no graphics. For these visitors, you can provide alternate text to show in place of the images.
1. Select the image by clicking on it.
2. Click Edit on the Menu bar and select Image Properties from the drop-down list that appears.
3. The Image Properties dialog box will appear. Select the General tab.
4. Type the alternate text into the Alternate Representations box.
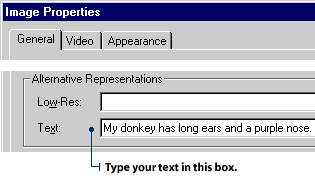
5. Click OK on the Image Properties dialog box.
15.19 Defining hyperlinks
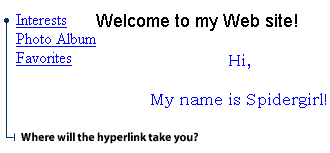
A "hyperlink" is a special part of a web page that instantly links you to another web page with a simple click of the mouse button. The expression "surfing the Net" actually refers to the experience of jumping from one page to another using hyperlinks. A hyperlink can take you to a new web site or to a different part of the web site you are visiting. Hyperlinks can also activate e-mail boxes that go directly to a web host's e-mail address. Your personal web site already has some hyperlinks in it. To see how they work:
1. Open a web page in FrontPage and click on the Preview tab.
2. Click on one of the links to another page. Then when you get to a new page, click on another link just to see how your pages are connected to one another.
15.20 Targeting links
By definition, every hyperlink must connect to another location. The target location can be another web site, another page within your web site, or even another location on the very same page. This means that before you create a hyperlink, you need to know the target. Targets are usually file names of pages within your web site or web addresses called URLs - which stands for "Uniform Resource Locator."
15.21 Creating a simple hyperlink
You can use a hyperlink to connect to another web site. The simplest hyperlink is one in which you type the URL directly into the web page. To do this:
1. Insert the cursor into the text area in FrontPage's Normal view.
2. Type in the URL. For example: http://www.actden.com/
3. Press the Enter key. You will notice FrontPage has automatically converted the text into a hyperlink.
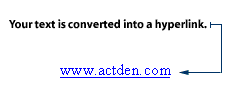
4. Check your new hyperlink by clicking the Preview tab and then clicking on the new hyperlink.
15.22 Turning text into a hyperlink
You can turn any text on a web page into a hyperlink. This type of link is called a "hypertext link". Here's how to turn a word into a hypertext link that leads your visitors to a page within your web site:
1. Click the Normal view tab in FrontPage.
2. Go to the first page of your web site. (You'll see the title of this first page at the top of the flow chart in FrontPage's Navigation view.)
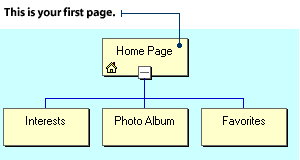
3. Type: "I have many interests and hobbies."
4. Select the word "interests" with your mouse and click on the Create or Edit Hyperlink button. This will open the Create Hyperlink dialog box.

5. Click the page or file name that you want to link to. For example:
interest.htm The file name will appear in the URL box.
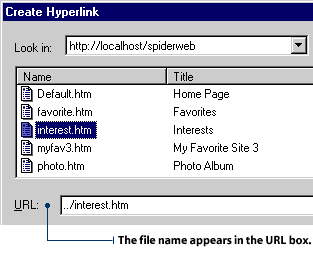
6. Click OK in the Create Hyperlink dialog box.
7. Click the Preview tab, then click on the hypertext link "interests" to check your new hyperlink.
15.23 Linking to a new page
If you're creating hyperlinks and notice you've left out a page in your web site, you can add and link to a new page - all at the same time. To link to a new page:
1. Click the Normal tab in FrontPage.
2. Insert the cursor into the text area in FrontPage's Normal view and type: "This is my latest web page."
3. Select the word "latest" using the mouse and click on the Create or Edit Hyperlink button. This will open the Create Hyperlink dialog box.

4. Click the New Page button. The New dialog box will appear.

5. Choose Normal from the list of page styles and click OK in the New dialog box.
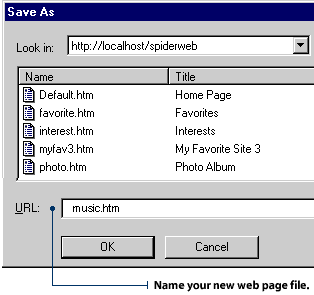
6. Be sure to save your new page. Type a short, descriptive file name into the URL box and click OK in the Save As dialog box.
15.24 Creating an e-mail hyperlink
If you want to get feedback from your visitors, you can create a hyperlink that targets your e-mail address. When visitors click on your e-mail hyperlink, they can send you an e-mail message by writing in the e-mail pop-up box that is launched. This makes it easy for your visitors to send you questions or comments. To create a hyperlink to your own e-mail address:
1. Click the Normal tab in FrontPage.
2. Insert the cursor into the text area in FrontPage's Normal view and type: "Contact me."
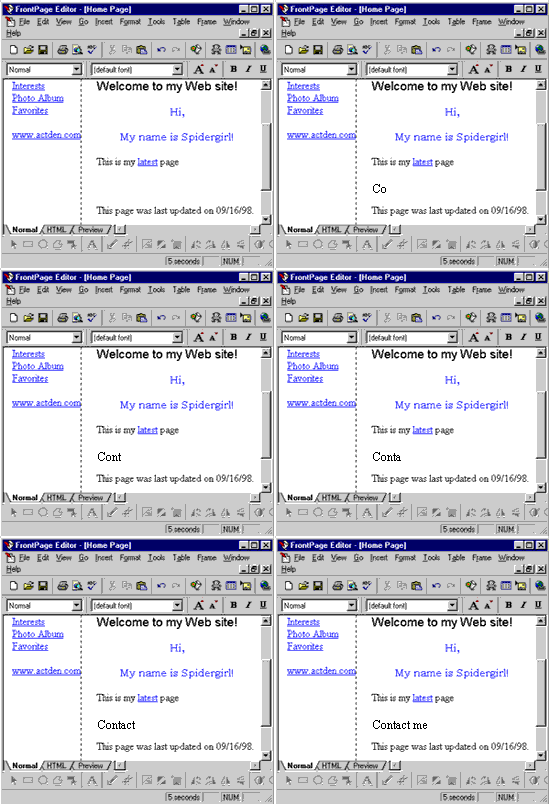
3. Select the words "Contact me" using the mouse and click on the Create or Edit Hyperlink button. This will open the Create Hyperlink dialog box.
4. Click the Make a Hyperlink that Sends E-mail button. The Create E-mail Hyperlink dialog box will appear. Type in your e-mail address and click OK.
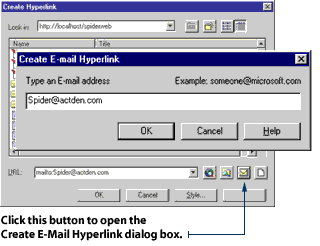
5. Click OK in the Create Hyperlink dialog box.
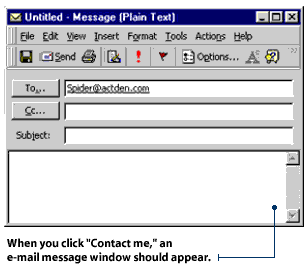
6. Click the Preview tab, then click on the "Contact me" text to check your new hyperlink.
15.25 Creating a bookmark
A "bookmark" is a hyperlink that takes your visitor to a particular spot on your web page. This option is good when you have a long web page with many different categories of information. For example, if you have a web page containing poetry by 20 different students, you might want to bookmark the name of each student in a list at the top of the page. Then, you can jump straight to the work of Mary Student by clicking on her name. Without bookmarks, you would have to scroll down the entire page searching for her work. Picture yourself as the guide for a lot of guests trying to find their way around. Use bookmarks to guide your visitors through your web site smoothly - making them as comfortable as possible, like a considerate host. You can bookmark the top of the page, so it's easy for your visitors to get back to where they started. You can also bookmark an index, a table of contents, a subheading and anything else that helps to organize your web site content. The first step in making a bookmark is to select a target for the bookmark. The target is the spot you want your bookmark to jump to - like a heading or subheading.
1. Click the Normal tab in FrontPage.
2. Use your mouse to select the heading or subheading you have chosen as your target.
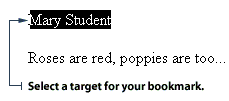
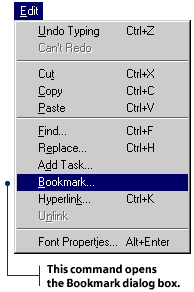
3. Click Edit on the Menu bar and select Bookmark. You will then see the Bookmark dialog box.
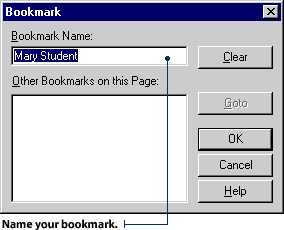
4. Type the name of your bookmark in the Bookmark Name box, then click OK.
15.26 Linking to a bookmark
1. Insert the cursor into the text area in FrontPage's Normal view. Then type: "Go to [the name of the target]". For example: "Go to Mary Student". This is the link that your visitors will click on to jump to the bookmark.
2. Use your mouse to select the text you just typed, then click on the Create or Edit Hyperlink button. This will open the Create Hyperlink dialog box.
3. In the Create Hyperlink dialog box, find the file that contains your bookmark. Click the file name and it will appear in the URL box.

4. Click on the Bookmark drop-down list and select the name of your bookmark. Then click OK.
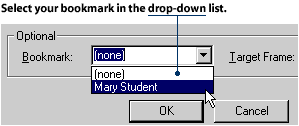
5. Test your new bookmark in Normal view by holding down the CTRL key while clicking the new hyperlink.
15.27 Turning a graphic into a hyperlink
There are a number of reasons you might want to use a graphic as a hyperlink. For example, you can use a graphic as a navigation button that links to another page in your site. Or perhaps you can link a thumbnail version of an image to a larger version of the same image. To turn a graphic into a hyperlink:
1. Click the Normal tab in FrontPage.
2. Select the image by clicking on it.
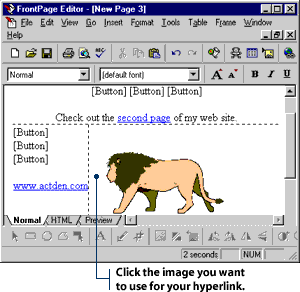
3. Click the Create or Edit Hyperlink button. This will open the Create Hyperlink dialog box.
4. Select the web page you want to link to, then click OK.
15.28 Creating an image map
An image map is a large graphic that has different hyperlinked areas within it. These hyperlinks - known as hotspots - come in three different shapes: rectangle, circle or polygon. FrontPage provides you with tools to assign these shapes to your image map. An image map is useful when you have many related categories in your web site. For example, imagine you are making a web site for your school and you want to devote one page to each grade. You could use a drawing that shows a cross-sectional view of a school with many rooms. Each room could be used as a hotspot that acts as a hyperlink to the page for each grade. Any image can be made into an image map as long as it is large enough to assign more than one hotspot. To add a hotspot to a graphic:
1. Select the graphic by clicking on it.
2. Click the Polygon button on the Image Toolbar.
3. Place the cursor over the graphic. It will turn into a small cutting tool.
4. Draw a shape around a section of the graphic by dragging and clicking your mouse over the graphic.
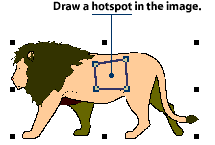
5. Press the Enter key when you have drawn your hotspot shape. The Create Hyperlink dialog box will appear.
6. Select the name of the web page you want to link to, then click OK.
7. Click the Preview tab, then click on your new image map to check your linked hotspot.
15.29 Changing hyperlink colors
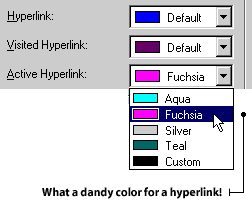
Hyperlink text (hypertext) is colored differently than the rest of the text so your visitors can identify it easily. Hypertext comes in three standard colors: blue, red and purple. Blue hypertext tells your visitor: "Here is a link you have not yet followed." Purple text usually indicates a visited link. It tells your visitor: "Here is a link you have already followed." Red text is usually used for an active link. This color tells your visitor: "Here is a link that you are following right now." You can change these standard colors to contrast or blend in with the other colors in your web site. To change hyperlink colors:
1. Click the Normal tab in FrontPage.
2. Click the File menu and select Page Properties.
3. Click the Background tab on the Page Properties dialog box.

4. Select the three different
hypertext colors from the drop-down boxes and click OK in the Page Properties
dialog box
15.30 Editing hyperlinks
You may need to edit your hyperlinks for a number of reasons. Maybe one of your external web site links has a new URL. Maybe you have changed your e-mail address and need to update your e-mail hyperlink. Maybe you have rearranged your web site content or made some other change that will be reflected in your site.
To change or delete the URL of a text hyperlink:
1. Click the Normal tab in FrontPage.
2. Click the hyperlink you want to change, then click the Create or Edit Hyperlink button.

3. To change the hyperlink target, click on a different file name. If you want to change the e-mail target or create a new page, click on the appropriate button.

4. To delete the hyperlink target, delete the URL in the Edit Hyperlink dialog box by pressing the Delete key, then click OK.

To change or delete the URL of a
graphic hyperlink:
1. Click the Normal tab in FrontPage.
2. Select the graphic by clicking on it, then click the Create or Edit Hyperlink button.
3. To change the hyperlink target, click on a different file name. If you want to create a new page or change the e-mail target, click on the appropriate button.
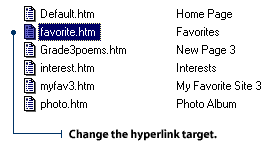
4. To delete the hyperlink target, delete the URL in the Edit Hyperlink dialog box by pressing the Delete key, then click OK.
15.31 Using tables in web pages
Tables are used to display information in columns and rows -
similar to how they are usually used in spreadsheets and word processing
programs. Yet they are also used as a graphic design tool for laying out text
and images on your web page. If you want to arrange your text in columns or
place graphics that appear to float freely on the page, you will need to put
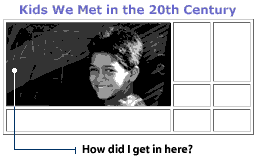
this content into tables with invisible border lines. The table below shows how
you can use a table to place your text and images. The lines have been left
visible so you can see the table - but you would not normally be able to see
them.

15.32 Creating a simple table
1. Open a web page in FrontPage and click on the Normal tab.
2. Insert the cursor into the area where you want the table to be. Never place a table at the very top of your web page because doing so will prevent you from inserting new text above it in the future.
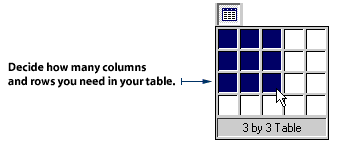
3. Click the Table button on the Standard toolbar.

4. You will see a drop-down grid. Select the number of columns and rows you want by holding down your left mouse button and moving the pointer down and to the right. A table will appear when you let go of your mouse button.
15.33 Adding text to table cells
A "cell" is one of the boxes in the table. When you place
your text or graphics into a table, you place it into one cell.
![]()
![]()
To enter text into a cell:
1. Position the cursor in the cell.
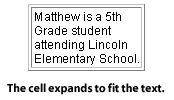
2. Start typing. The cell will automatically expand to accommodate the text.
15.34 Adding captions to a table
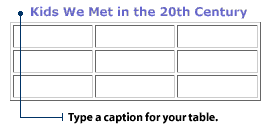
The caption of a table is like its title or heading. Unlike other text, caption text automatically moves with the table if you want to relocate it on your web page. To add a caption to a table:
1. Select the table by clicking anywhere within it.
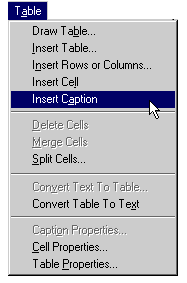
2. Click Table on the Menu bar and select Insert Caption.
3. The cursor will move to the top of the table. Type in your caption. You can format caption text the same way you format regular text.
15.35 Adding images to a table
1. Position the cursor in the cell.
2. Click the Insert Image button. The Image dialog box will appear.

3. Choose an image and click Insert.
15.36 Defining borders
Borders are the lines that give your table a grid-like appearance. You can adjust the width, color, and shadows of these borders using a few simple commands. To define table borders:
1. Position the cursor in the table.
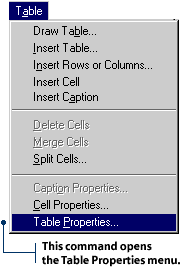
2. Click Table on the Menu bar and select Table Properties.
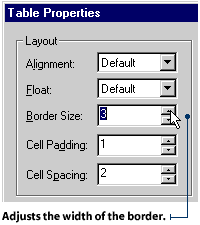
3. To adjust border width, adjust the spin controls on the Border Size box. The numbers you see represent "pixels" - a size measurement traditionally used by graphic designers.
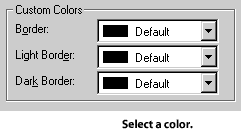
4. To adjust the color of the border and its shadows, select colors from the drop-down box under Custom Colors.
5. Click OK in the Table
Properties dialog box.
NOTE: If you want to use tables to lay out graphics, you can create an invisible table by choosing a zero setting in the Border Size box. FrontPage will still display the gridlines in Normal View so it will be easier for you to work with your table. However, these lines are for your reference only. They will disappear in Preview mode and your web site visitors will not see them.
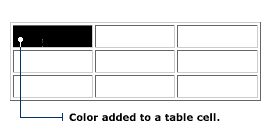
15.37 Adding background colors
You can add a background color to your entire table - but be careful. While Internet Explorer recognizes background colors in tables, other browsers may not. If you want to make sure that your text will be legible in all browsers, choose a text color that is in sharp contrast to your web page background. If the table's background color does not appear in your visitor's browser, people will still be able to read the text. To add a background color to a table:
1. Position the cursor in the table.
2. Click Table on the Menu bar and select Table Properties.
3. Select a color from the Background Color drop-down box.
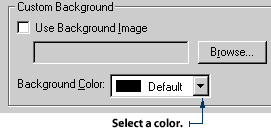
4. Click OK in the Table Properties dialog box.
15.38 Adding rows and columns
To add a new row:
1. Place the cursor in the bottom-right cell.
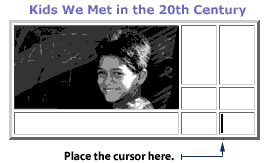
2. Press the TAB key on your keyboard.
To add a column:
1. Place the cursor in a cell next to where you want to add a column.
2. Click Table on the Menu bar and select Insert Rows or Columns. You will see the Insert Rows or Columns dialog box.
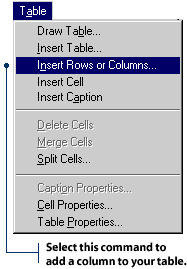
3. Click the Columns radio button, then adjust the spin controls on the Number of Columns box.
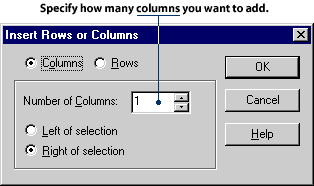
4. Click OK to close the dialog box.
15.39 Defining cell padding and cell spacing
"Cell padding" refers to the amount of space between the edge of the cell and the text or image within it. "Cell spacing" refers to the amount of space between each cell. When you adjust these two attributes, your selection will apply to the entire table. In other words, you cannot apply cell padding and cell spacing to only specific cells. To define cell padding and cell spacing:
1. Position the cursor in the table.
2. Click Table on the Menu bar and select Table Properties.
3. To adjust the padding and spacing, adjust the spin controls for the Cell Padding and Cell Spacing boxes.
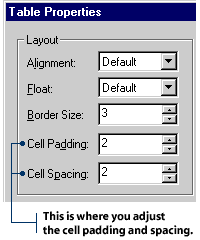
4. Click OK in the Table Properties dialog box.
15.40 Changing cell width and height
To make all your table columns and rows equal in width:
1. Select an entire row or column. You can do this by placing the mouse pointer above the top border or next to the left-hand border of your table. Once the pointer turns into an arrow, click your left mouse button once.
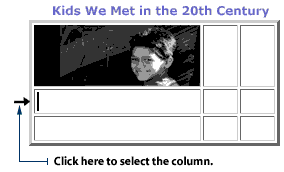
2. Click Table on the Menu bar and select Table Properties.
3. Click on Distribute Columns Evenly or Distribute Rows Evenly.
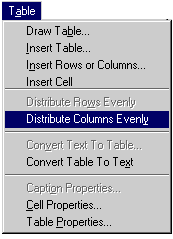
To adjust cell height and width:
1. Position the mouse pointer over a border until it turns into a double-headed arrow.
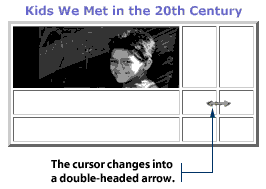
2. Hold down your left mouse button, then drag your mouse left or right, up or down, to adjust the cell size.
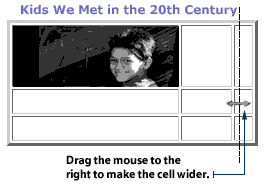
3. Release the mouse button to lock the border into place.
NOTE: You cannot make this adjustment to the left-edge and top-edge borders.
15.41 Aligning objects in cells
You can align objects in cells - vertically, horizontally, or centered. There are two ways to do this:
To horizontally align objects in a cell:
1. Select the text or image in the cell.
2. Click one of the alignment buttons on the Format toolbar to Align Left, Center, or Align Right the object.
![]()
To vertically align objects in a
cell:
1. Select the text or image in the cell.
2. Click Table on the Menu bar and select Cell Properties.
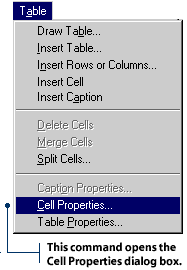
3. Select an alignment option from the Vertical Alignment drop-down box.
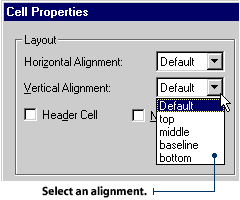
4. Click OK in the Cell Properties dialog box.
NOTE: If you select Bottom, the object will align with the bottom of the cell. If you select Baseline, the object will align with the bottom of the cell's largest text.
15.42 Putting a table within a table
You can place a table into a cell - creating a table within a table. You may want to do this if you have a very complex graphic layout and need to align objects in particular way. Nested tables are also helpful if you need to add more white space to one particular cell.
To place a table within a table:
1. Place the cursor in the cell into which you want to add a table.
2. Click the Table button on the Standard toolbar.
3. You will see a drop-down grid. Select the number of columns and rows you want by holding down your left mouse button and moving the pointer down and to the right. A table will appear when you let go of your mouse button.

NOTE: Putting a table within a cell can make cell alignments and attributes much more complex - so be prepared to experiment. It's also a good idea to see what your table looks like in a few different browsers. Even different versions (i.e. version 4, 5, or 6) of the same browser may present nested tables differently.
15.43 Using tables for visual summaries
Tables have two main uses in a web site - as a graphic layout tool, and as a way to organize information. Tables can be very useful when you are laying out a complex graphic arrangement, although it's best to try this when you have a good bit of time on your hands. Using tables for graphic layout can be tricky; you'll probably need to do some experimenting to get it right. If you're working on a tight deadline, you may want to save this fancy stuff for when you have more time to play around. When you're using tables to organize data and convey information, there are many ways to go about it. Tables are great when you want to do a key visual summary. They allow you to condense stories, processes, debates and other information in a straightforward and simple way. Here are a few examples:
1. Comparing and contrasting two objects, people, or places
For example, let's say you are comparing apples and oranges. Make a table with two cells across and several cells down. Type APPLES at the top of one column and ORANGES at the top of the other. Then list all the qualities of apples in cells under the first column, and all the qualities of oranges under the other column. You can also add a third column on the left-hand side to label the qualities that you are describing. For example, color, shape, taste, etc.
|
Comparing Apples and Oranges
Let's say you want to present the career of a famous sports star. Make
a table with two rows and as many columns as you need for the different
time periods. Enter the year of the event in the top row, then enter the
event description in the bottom row.
The Career of Slam Jones
This is similar to the comparing and contrasting table described above.
Make a table with two cells across and several cells down. If you are
debating the "Reasons For and Against Midnight Snacks", place REASONS FOR
at the top of one column and REASONS AGAINST at the top of the other. Type
your reasons into each of the columns.
Let's say you are explaining the different parts of a computer. Make a
table with two cells across and several cells down. Into the cell on the
left, type "keyboard." Into the adjacent cell on the right, type in "for
typing." Continue on, describing all the different parts.
Parts of a Computer
|
15.44 What's background sound?
You can add background sound to your web site by inserting
sound files. Then, when your visitors arrive at your web site, they will hear
these sound files through their own computer speakers. Background sounds can
convey the theme of your site or set the ambiance. For example, a web site that
features martini recipes might play lounge music in the background. A hockey web
site might play the sound of cheering fans. A North Pole web site might have the
sound of Santa's friendly "Ho ho ho". Just like the different types of image
files, there are also different types of sound files that can be transmitted on
the World Wide Web. The most common audio format is the .wav file, pronounced
"WAVE". There are also many others, including RealAudio files (.ram); MIDI files
(.mid); AIFF sound files (.aif); and AU sound files (.au). Each type of sound
file is generally more suitable for a different type of sound. For your visitors
to hear these various sound files, they must have corresponding software to
download and play them. However, there is no way for you to know what software
your visitors have on their computers. This means you must assume that not all
visitors will hear your background sounds.
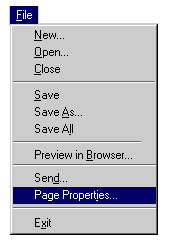
Adding background sound To add background sound to your web page: 1. Click the Normal tab in FrontPage. 2. Click File on the Menu bar and select Page Properties. 3. Click the General tab in the Page Properties dialog box.
4. Click the Browse button in the Background Sound section and select an
audio file from the list. If you don't see anything in this list, this means you
don't have any audio files saved on your computer. If you need a good source for
sound files, try one of the many sound effects CDs now available.
6. Click OK on the Page Properties dialog box.
NOTE: Think twice before you click the Forever check box. Some sounds can be
very pleasing, while others can be very annoying. What will it be like for your
visitor to hear your audio file over and over and over and over? Is it the kind
of sound that would be good to hear repeatedly?

5. Decide how many times you want your sound to be played.
Enter this number into the Loop spin control box. If you want the sound to play
continuously, click the Forever check box.

Saving your sound file
When you add a background sound file to your web page, it isn't a permanent part of the site until it is saved individually - just like image files. To save your background sound file:
1. Click the Save button on the Standard toolbar.
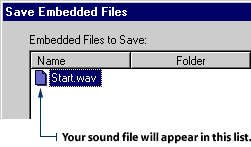
2. The Save Embedded Files dialog box will appear and you will see your sound file on a list. Click OK in the Save Embedded Files dialog box.
15.45 Inserting a video clip
You can add a video clip to your web site. Video clips are usually saved as AVI files (Audio Video Interleave). RealPlayer is another format that produces excellent quality audio and video. You can get AVI files from many CDs now available. You can also download them from many different web sites. If you choose this option, make sure you keep your local copyright laws in mind. To add an AVI file from a CD:
1. Click Insert on the Menu bar.
2. Select Picture and then click Video.
3. The Video dialog box will appear. Click the Select A File on Your Computer button.

4. Select your CD drive, then select the AVI file you want to use.

5. Click OK on the Video dialog box.
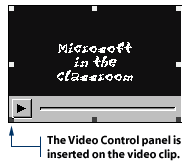
15.46 Adding a video control panel
You can provide a video control panel on your web site. This will allow your visitors to start, stop and control the volume of your video clip. To add a video control panel:
1. Select the video clip by clicking on it.
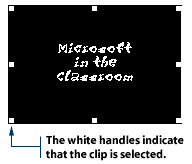
2. Click Edit on the Menu bar and select Image Properties.
3. The Image Properties dialog box will appear. Select the Video tab.
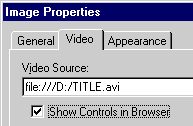
4. Select the Show Controls in Browser check box and click OK.
15.47 Making your video run automatically
You can choose to have your video clip start playing as soon as your visitor arrives at your site. Here's how:
1. Select the video clip by clicking on it.
2. Click Edit on the Menu bar and select Image Properties.
3. The Image Properties dialog box will appear. Select the Video tab.
4. Select the On File Open check box and click OK.

15.48 Defining forms
Forms are special tools used to collect information from your web site visitors. They allow you to conduct surveys and tests, collect names and addresses, order products and much more. By using forms, you can collect all kinds of information by asking questions similar to those you would find on a multiple-choice questionnaire.
Defining form fields
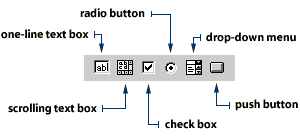
"Form fields" are info-gathering options placed on a web page. There are five main types: radio buttons, check boxes, drop-down menus, one-line text boxes and scrolling text boxes. Each type has its own special characteristics and is useful for gathering particular types of information. Your visitors enter information into these fields by typing text or clicking an answer choice.
Activating the Forms Toolbar
To activate the Forms Toolbar:
1. Click Insert on the Menu bar and select Form Toolbar.
Each of these six buttons gives you a different way to collect information from your web site visitors.
Creating a form
Let's make a form that you can use to find out about the people visiting your web site. A good way to start your form page is with a short sentence that invites visitors to use your form. For example:
Please take a few moments
to tell us about
yourself.
15.49 Creating radio buttons
Radio buttons are useful when you want your visitor to choose only one option from a multiple-choice list. To add a radio button:
1. Position your cursor below the introductory text and type I am:.
2. Press the Enter key on your keyboard, then click Radio Button on the Form Toolbar.
3. Position your cursor between the radio button and the Submit button, then press the Enter key on your keyboard.
![]()
![]()
4. Position your cursor to the right of the radio button. Type a K-12 teacher, then press the Enter key on your keyboard.
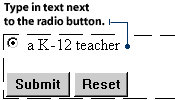
5. Click Radio Button button on the Forms Toolbar again. Type a student, then press the Enter key on your keyboard.
6. Add two more radio buttons as you did above, with the following text labels: a parent and other.
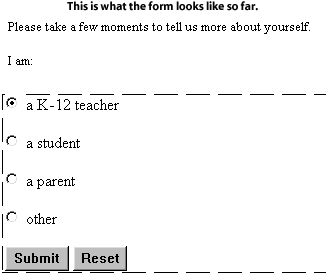
7. Double click on the first radio button. You will see the Radio Button Properties dialog box.
8. In the Group Name box, type the word who. A "group" refers to a group of answer choices that are associated with a question.
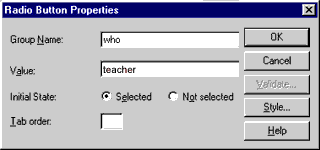
9. In the Value box, enter the word teacher. The "value" refers to one answer choice in a group of answer choices.
10. Click OK on the Radio Button Properties dialog box.
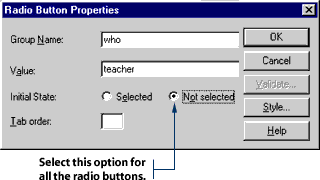
11. Repeat steps (7) through (10) for each radio button. Be sure to type the same name (who) into each Group Name box, but a different value name into each Value box (teacher, student, parent, other). Choose Not Selected as the Initial State for all of the radio buttons. This means none of the radio buttons will be selected when your visitor first sees the form.
15.50 Adding check boxes
Check boxes are useful when you want your visitor to mark all options that apply. For example, if you ask: "What are your hobbies?", your visitor may select one hobby or several hobbies that apply to them. Unlike radio buttons, you do not have to use check boxes in groups. You can use a single check box and ask a question like: "Do you want to receive e-mail updates?" You would use a group of check boxes when you want your visitors to select one or more options from a long list - like when you ask: "Which of the following answer choices apply to you?" To add a check box to your form:
1. Type the following text under the radio button section: Please let me know when you update your web site. Do not press the Enter key.
2. Click the Check Box button on the Form Toolbar. The check box will appear at the end of your sentence.
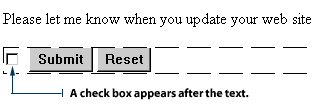
3. Double-click the check box.
4. You will see the Check Box Properties dialog box. Type the word update in the Name box. It's best to use a name you will remember.
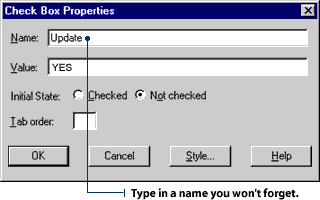
5. Enter "yes" in the Value box. You will see this Value box entry when you look at the information put in by your visitors - so give it a name that will make sense to you. In this case, "yes" will refer to your visitors' choice to receive your web page updates.
6. Select Not Checked where you see the Initial State radio buttons. This means the check box will not show a check mark when your web site visitor first sees it.

7. Click OK on the Check Box Properties dialog box.
15.51 Making a drop-down menu
Drop-down menus are handy when you want your visitors to select one or more options from a list. They also allow you to save web page space because the list is out-of-sight until your visitor selects it. To add a drop-down menu to your form:
1. Type the following text: I use the Internet:. Press the Enter key on your keyboard.
2. Click the Drop-Down Box button on the Form Toolbar.
3. Double-click the drop-down menu field that appears. You will see the Drop-Down Box Properties dialog box.
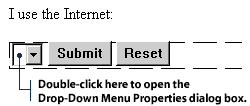
4. Type the word where into the Name box.
5. Click the Add Choice button and type at home into the Add Choice dialog box.
6. Click Selected, then click OK in the Add Choice dialog box.
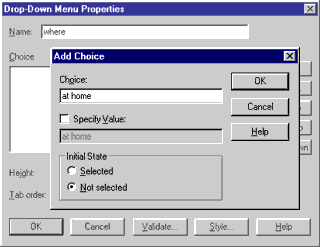
7. Repeat Step (5) then click Not Selected and OK in the Add dialog box as you add the following four choices: at work, at school, at the public library, and at other places.
8. Click the Allow multiple selections radio button so it is selected. This allows your visitor to choose more than one answer choice.
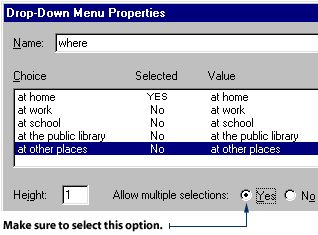
9. Click OK on the Drop-Down Box Properties dialog box.
NOTE: If you want visitors to choose more than one option, be sure to include some text instructions next to the drop-down menu.
15.52 Creating a one-line text box
A one-line text box is useful when you want to collect one line of information from your visitors. For example, you may want to ask your visitor's name, country, or phone number. To add a one-line text box to your form:
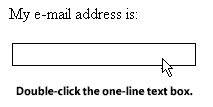
1. Type My e-mail address is:, then click the Text Box button on the Form Toolbar.
2. Double-click the one-line text box field. The Text Box Properties dialog box will appear.
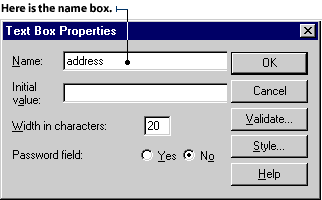
3. In the Name box, type the word address. You will see this Name box entry when you look at the input info from your visitors - so give it a name that will make sense to you. In this case, address will refer to the e-mail addresses submitted by your visitors.
4. Click the Validate button in the
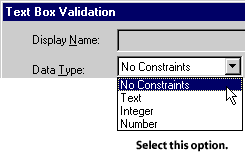
Text Box Properties dialog box. The Text Box Validation dialog box will appear.
5. Select No Constraints from the Data Type drop-down box and click OK. This will allow your visitors to type in whatever they want. Other options in this drop-down box allow you to limit what kind and how much data your visitors can enter.
6. Click OK in the Text Box Properties dialog box.
To change the size of the one-line text box:
1. Click once on the text box. Three resizing dots will appear on the left and right sides of the box.

2. Position your mouse pointer over one of the dots until it turns into a two-headed arrow. Click and hold your left mouse button, then drag the dot to change the size of the box.
15.53 Changing the Submit button
You may have noticed that FrontPage automatically adds a Submit and Reset button to your form. Your visitors send the form to you by clicking the Submit button. This means you must have a Submit button on your form page. The Reset button is not mandatory, but it allows your visitor to clear all the data on the form and enter new data. You may want to change the text on these buttons to make it more relevant to your web site or form. To change the text on the Submit button:
1. Double-click on the Submit button to open the Push Button Properties dialog box.
2. Type Send it in into the Value/Label box, then click the OK button.
Collecting data
You need to decide how to collect your visitors' information when they submit it to you. Many companies collect it in a database, but this generally requires the services of a computer programmer. However, you can have this information sent to you by e-mail, or you can collect it on a web page - and you won't have to do any programming.
NOTE: Check with your Internet Service Provider to make sure your server supports FrontPage.
Sending data to your e-mail
The advantage of having data sent to your e-mail is that you will know immediately if someone has submitted a form. The disadvantage is that it may be difficult to organize and analyze the data if you receive a lot of responses. You should choose the e-mail option if you are not expecting numerous responses. To have your visitors' data sent to you by e-mail:
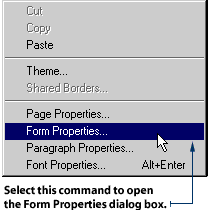
1. Right-click your mouse anywhere in the form.
2. Select Form Properties from the pop-up menu.
3. Click the Send To radio button to select it.
4. Delete the File Name that appears by default in the Form Properties dialog box. Leave this space blank.
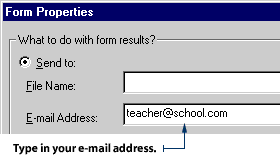
5. Type your e-mail address into the E-mail Address text box, then click OK.
Sending data to a Web page
The advantage of having data sent to a web page is that you can make your visitors' responses available to the public. You can present their information in the form of a guestbook, or you can send it to a web page for your own private use (in case you don't want your visitors to see it). To have your visitors' data sent to a web page:
1. Right-click your mouse anywhere in the form.
2. Select Form Properties from the pop-up menu.
3. Click the Send To radio button to select it.
4. Enter the file name of an existing HTML page in your web site, or click the Browse button to choose a page. This page is where FrontPage will send your visitors' data.
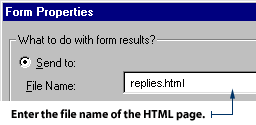
5. To receive e-mail notification when a visitor sends a response to the web page, type your e-mail address into the Form Properties dialog box.

5. Click OK in the Form Properties dialog box.
NOTE: If you prefer to keep the web page private, you should send the form data to an HTML page in your _Private folder. Just click the Browse button in the Form Properties dialog box and navigate to the _Private folder. Then, select or create an HTML page there. When you send your form data to a web page located in the Private folder, the majority of your visitors will not see it. However, some technical people may be able to crack into the file and read its contents.
15.54 Adding a timestamp
A timestamp tells your visitors when you last updated your web page. This option is especially valuable if you are presenting current events and activities - showing your visitors just how fabulously up-to-date your web site really is. For example, you may want to use a timestamp if you are publishing daily or weekly updates on activities at your school. The best place for a timestamp is the opening page of your web site. This way, your visitors will see it right away. To add a timestamp:
1. Click Insert on the Menu bar and select Date and Time. The Date and Time Properties dialog box will appear.
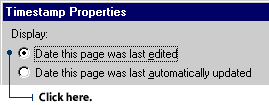
2. Select the Date This Page Was Last Edited radio button.
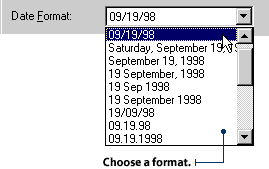
3. Choose how you want the date to be displayed by selecting a format from the Date Format drop-down box.
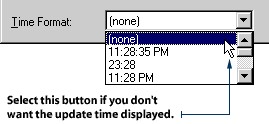
4. Choose how you want the time to be displayed by selecting a format from the Time Format drop-down box. If you do not want to display the update time select None.
5. Click OK on the Date and Time Properties dialog box.
15.55 Adding a hit counter
Each time someone visits one of your web pages, this is known as a "hit". You can keep track of how many visitors you have by including a "hit counter" on your web page. A hit counter is visible to your visitors, so it is a good option to use when you want to show off the popularity of your web site. To add a hit counter:
1. Click Insert on the Menu bar.
2. Select Web Component and then click Hit Counter. The Hit Counter Properties dialog box will appear.
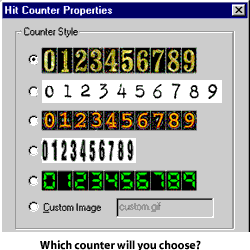
3. To choose how your counter will look, select one of the Counter Style radio buttons.
4. You can specify a start number for your counter. For
example, if you want the hit counter to start from the number 10, select the
Reset Counter To check box and type 10 into the box.
5. You can also specify how many digits you want displayed. For example, if
you think only a few hundred people will hit your site, you may want to limit
your counter to three digits. If so, simply select the Fixed Number of Digits
check box and type 3 into the box.
6. Click OK on the Hit Counter Properties dialog box. 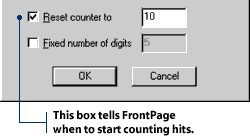
15.56 What does it mean to publish a web site?
When your web site is ready for Internet visitors, you will need to "publish" it. When you first created your web site files, you stored them on your own computer only. To make your web site available to the public, you need to transfer your files to a computer that is has a special connection to the Internet. This type of computer is known as a "web server."
What is a web server?
A "web server" is a high-powered computer that stores web
site documents. One web server may store documents for many different web sites.
When people visit your web site, they do so by connecting to your server through
the World Wide Web. This Internet connection allows visitors to receive - or
"download" - your web site documents into their own computers. Many businesses
and institutions - including schools and school boards - use their own servers
to connect to the Internet. Many people also connect to the Internet using an
Internet Service Provider (ISP). An ISP is a company that specializes in selling
Internet access and web site file space on its servers. You publish your web
site when you "rent" space for your web site files on an ISP server. Many large
cities have a variety of ISPs to choose from and most small towns are likely to
have at least one ISP. You'll want to make sure your web site is in good working
order before you publish it. It's important to check your hyperlinks to make
sure your visitors will get to the places you are offering to send them. You'll
also want to ensure that every word in your entire site is spelled correctly.
Checking hyperlinks
A hyperlink is meant to link your visitor to a particular target. If you
don't have the hyperlink identified correctly, it's like giving your visitors
the wrong phone number or address. Instead of seeing what you have planned for
them, your visitors will see a message that tells them the page they are looking
for does not exist. So, if you want to be a good web site host, you'll want to
make sure you send your visitors to the right places. You can check your
hyperlinks in FrontPage Explorer. Here's how: 1. Open one of your web pages in FrontPage.
2.Click Hyperlinks on View toolbar.
3. To check the hyperlinks for each page, click on the file name found on the
left side of the Hyperlinks View. In the right side, you will see a map graphic
showing how that page is linked to the rest of your web site.

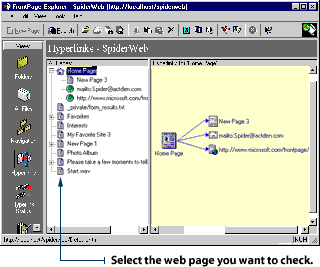
4. Click the file name for each web page to see its corresponding graph.
NOTE: You must be connected to the Internet to check the hyperlinks on any of your pages that link to sites outside your own, on the World Wide Web. You can also test specific hyperlinks. Here's how:
1. Select a file by clicking it in FrontPage window.
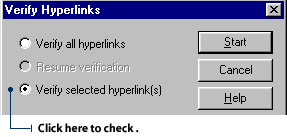
2. Click the Verify Hyperlinks button on Standard toolbar. You will see the Verify Hyperlinks dialog box.

3. Select the Verify Selected Hyperlinks radio button and click the Start button on the Verify Hyperlinks dialog box.
Checking all spelling
To check all the spelling on your web site:
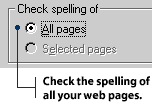
1. Click the Cross File Spelling button on Explorer's Standard toolbar. The Spelling dialog box will appear.
![]()
2. Select the All Pages radio button and click Start in the Spelling dialog box.
Finding an ISP or Web Host for Your Web Site
With many different ISPs for you to choose from, you'll want to consider a few things before making your decision. For example, how much will an ISP charge to store your web site documents on their Web server? You may also want to find out how much customer support an ISP will provide. It's very convenient, and often very important, if you can phone your ISP and get instant assistance from a customer support representative. You'll probably want to shop around to see who will offer you a good deal and lots of helpful advice. When you do, the sales representatives for the ISPs will ask you a few questions to determine the services that you will need. FrontPage can help you collect the answers to their questions so you can "talk the talk".
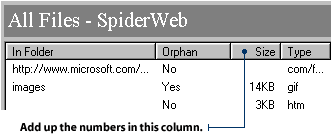
How big is your site? The "size" of your site refers to the total amount of file space that will be taken up by all the documents on your site - including images, sounds, video and any other multimedia effects. This file size is measured in kilobytes (KB), which contain 1,000 bytes. File size is also measured in megabytes (MB), which contain 1,000 kilobytes. Since you'll be renting space for your web site documents on the ISP server, you'll be charged a space fee. This fee is based on the total amount of file space that your documents will occupy on the ISP server. When you're shopping around for an ISP, you need to tell your potential web hosts how big your site is. That way, it'll be easier for them to quote you a rental fee, which will generally be charged on a per-month basis.
To check the total size of your web site:
1. Open your web site in FrontPage.
2. Click All Files on the Views toolbar.

3. Calculate the size of the web site by adding the numbers in the Size column.
Inquiring about FrontPage server extensions
"Server extensions" are like special mini-programs that a server needs to
interpret the computer code FrontPage has used to create all your web site
options. Your ISP server must have FrontPage server extensions installed so that
all parts of your web site are available to your visitors. They are especially
important if you have included forms or a hit counter on your web site. You'll
need to find out if your Internet server supports FrontPage server extensions -
but you can't get this information from your own computer. You'll need to ask
your ISP or the administrator in charge of your school's server.
NOTE: If you have used FrontPage 2000 to create your web site, make
sure you specify this. Other versions of FrontPage use different server
extensions - so your Internet server must have the 2000 extensions installed.
Obtaining access
You will be assigned a user name and password after you have arranged to put
your web site documents on an Internet server. You will need this name and
password to access the server space that has been allocated to you. In other
words, you will use these two pieces of information whenever you want to change
or update the web site on the web server.
Obtaining a location
You will be given a URL for your web site - which is a WWW address like:
www.ourschool.edu. You can register your own unique name, like coolschool.net -
but you will have to pay an extra fee to do so. You can also use a free URL that
is assigned by your ISP or server administrator. This location is your Internet
address. Once you know your URL, you can give it to people and let your future
visitors know where to find you.
What does upload mean?
Once you have made all the arrangements, you need to "upload" your
information to the web server. In other words, you need to move the files on
your computer to the web server that will present your site to the Internet. The
most common method of moving these files to the server from your own computer is
by using a transport method known as "FTP". FTP stands for "file transfer
protocol". FTP allows you to transfer files through the Internet. FrontPage can
help you transfer files using FTP.
Uploading your web site To upload your web site, make sure that your computer is connected to the
Internet and follow these steps: 1. Click the Publish button on FrontPage's Standard toolbar. 2. In the Publish FrontPage Web dialog box, specify the location where you
want to publish your web site. Choose the location from the drop-down list or
type it directly into the text box. 3. Click OK in the Publish FrontPage Web dialog box. NOTE: Remember you will have to be connected to the Internet to upload
your web site to the web server.
Sharing your work on Web site management
If you've made a web site and it's on the Internet, give yourself a good,
hearty pat on the back. If you're just about to start a web site -
congratulations. It takes effort and energy to get it done. In the end, though,
when you're happily clicking your hyperlinks and listening to your audio files,
you'll be glad you did it. As a web pioneer, consider sharing your knowledge
with your colleagues. Take notes as you make your first site. Were there any
areas that were more challenging than others? Anything that worked particularly
well? Anything you want to do differently next time? Keep these notes in a
little book and read over them before you start your next Web project. This way,
you can easily refresh your memory and build on your experience. Other teachers
will appreciate learning what you have done, so consider starting a Web site
group that meets once a month. Share your secrets and learn some new ones.
Discover the best ISPs in your city or town. Find out if they support FrontPage
Server extensions - and pass on the news or post it somewhere for other teachers
to see. This will save someone else from doing research you've already done.
What comes around, goes around. Whatever you do to help others will ultimately
be a benefit for everyone. As more information continues to get to more people,
there will be more interesting Web sites to visit.